Category: General

  • Master AI Fundamentals in Just 18 Minutes

    Master AI Fundamentals in Just 18 Minutes

    Still Think You’re Late to the AI Party? Think Again

    You’re not late. You’re behind a few simple tricks. Generative AI looks like magic until you learn the basics. Then it’s just tools doing the heavy lifting while you steer. In 20 minutes you can rewrite your daily workflow and join the top 1% of AI users—without quitting your job or memorizing a prompt bible.

    You’ll walk away with a clear mental model, a repeatable prompt formula, and a 10-minute action plan you can use today.

    illustration

    How AI LLMs Really Think

    Think of an LLM as a prediction engine trained on a giant text diet. It learns which word pieces follow which other pieces. When you ask something, it predicts the next token, again and again, until output appears.

    Why that matters for you:

    • Good input = good output. Give it useful context and you get sharper answers.
    • It mimics patterns, not intentions. If it sounds human, it copied human patterns.
    • Context is king. More relevant detail → fewer hallucinations.

    AI won’t replace you—someone better at AI will. Learn to prompt like a pro and you stay irreplaceable.

    illustration

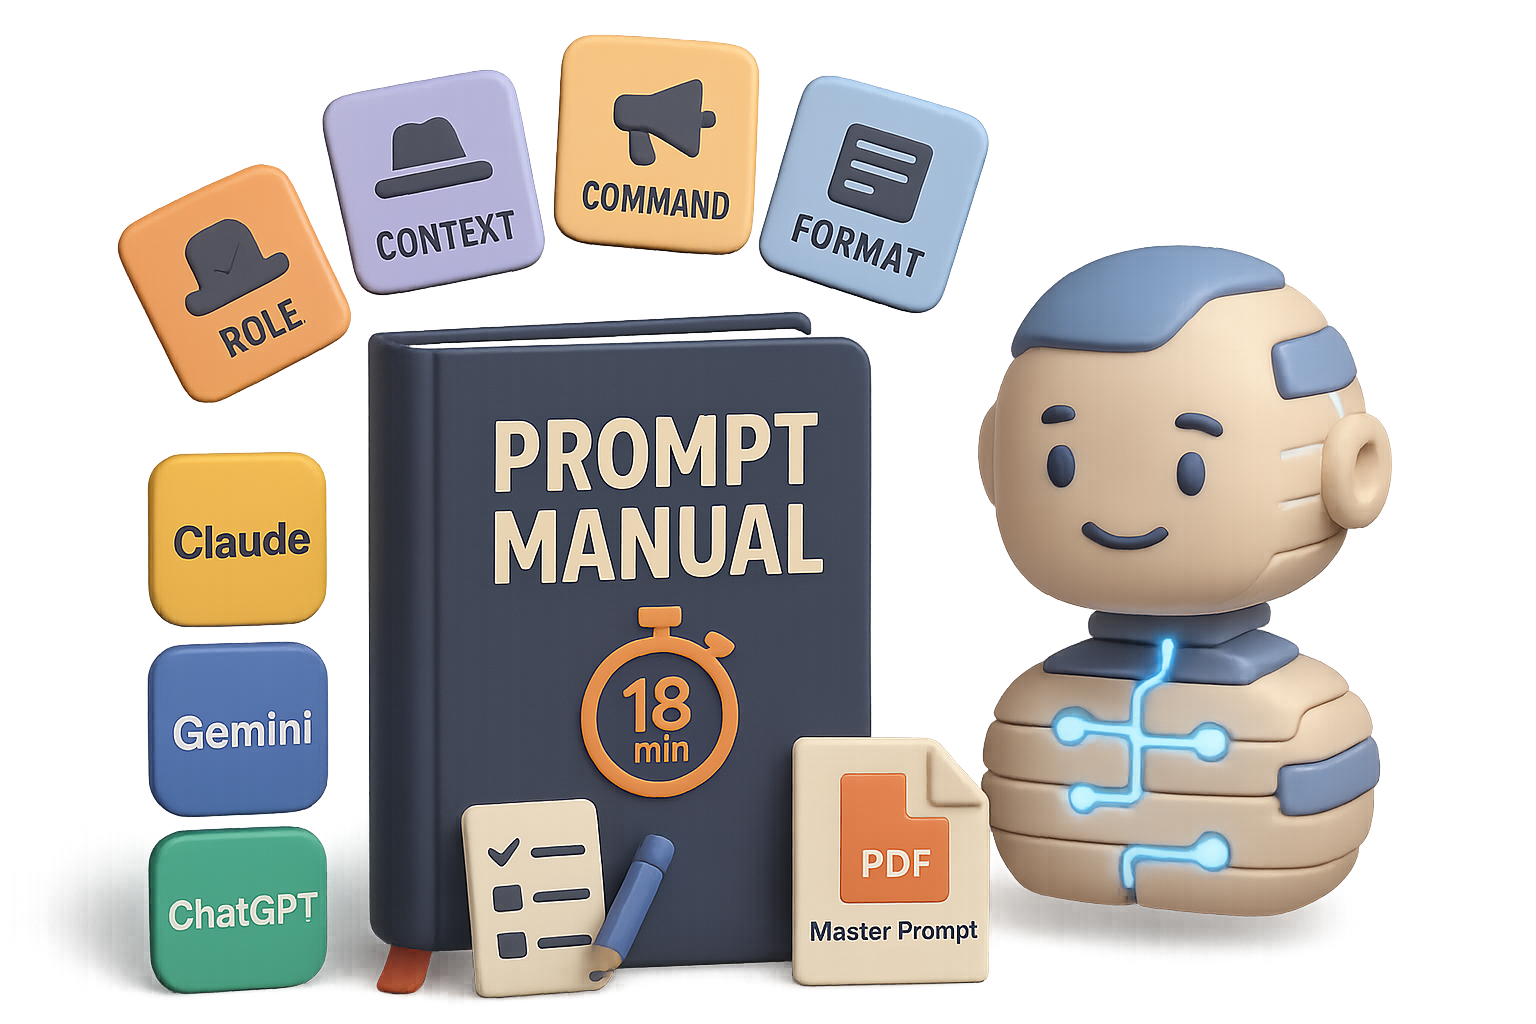
    Stop Wasting Prompts — Use the 4-Part Formula

    Short prompts get short results. Use this structure and watch the model do the heavy thinking.

    1. Role — “You are a world-class SaaS conversion strategist.”
    2. Context — Paste research, transcripts, or specs. Make it relevant.
    3. Command — Be explicit: “Write a 3-email onboarding sequence.”
    4. Format — Specify bullets, table, or a 3-line template.

    Pro tip: give a tiny sample output under Format. That prevents drift.

    illustration

    Pick ONE AI Tool and Go Deep

    Switching platforms is like learning piano and drums at once. Choose one and master it.

    • Claude (Anthropic) — great for long documents and code refactors.
    • Gemini (Google) — strong for research inside Google apps.
    • ChatGPT (OpenAI) — the integration king: plugins, APIs, community.

    Once you think in prompts, switching tools becomes trivial. Pick one, build your master prompts there, then expand.

    illustration

    Push vs Pull Prompting: Work Smarter

    Most people push instructions step-by-step. You do the thinking. Flip that.

    1. Define the destination: “I need a 6-email nurture that books demos.”
    2. Tell the AI: “Ask me what you need to build this.”
    3. Answer its questions—voice-to-text works great.
    4. Let the model design the path.

    Result: you build GPS instead of scribbled directions.

    Create a Master Prompt for Every Hat You Wear

    A Master Prompt is your “how I work” file. Make one for each role: CEO-You, Marketer-You, Mentor-You.

    Include:

    • Your background and goals.
    • Product or company specifics.
    • Writing tone and favorite frameworks.
    • Constraints (budget, timelines, brand rules).

    Save it as a PDF. Upload it once to any new AI tool. The stranger becomes a long-time colleague.

    System Prompts: Automate Repeatable Brilliance

    When you refine a chat into gold, capture it.

    1. Ask the model: “Create a system prompt that reproduces this workflow.”
    2. Answer follow-ups. Test and tweak.
    3. Save as a Custom GPT, Claude Project, or Gemini Gem.

    You’ve just built a mini-machine that delivers consistent results.

    illustration

    Future-Proof Skills: Taste, Vision, Care

    AI automates tasks. It won’t replace your judgment.

    • Taste — consume top work in your field. Let quality shape your instincts.
    • Vision — block out thinking time to sketch new ideas. Models optimize; you invent.
    • Care — use the time AI frees to mentor teammates and build relationships.

    Those remain human advantages.

    illustration

    Your 10-Minute Action Plan

    Do this now. It takes ten minutes.

    1. Pick a repetitive task you do every day (drafting emails, summarizing calls).
    2. Apply the 4-part prompt formula to delegate it to your chosen model.
    3. Save the prompt as a Master Prompt PDF. Upload it to your tool.
    4. Set a calendar reminder to refine the prompt tomorrow.

    Checklist:

    • Task chosen
    • 4-part prompt written
    • Prompt saved and uploaded
    • Reminder set for iteration
    illustration

    Quick Credibility Notes

    Capture wins and measure them. Track time saved or closed revenue. Numbers sell. Even small metrics—minutes saved per task or $1.2k in extra revenue—build trust fast.

    illustration

    One small win today beats ten hours of bookmarked tutorials. Ship one automated task. Iterate. Win.

    Ready when you are. Learn practical AI skills for beginners at tixu.ai — a friendly, step-by-step AI learning platform to help you go from curious to confident.

  • Build a Monetized AI Affiliate Site in 30 Minutes

    Build a Monetized AI Affiliate Site in 30 Minutes

    Why AI-Powered Affiliate Marketing Is the Perfect Side-Hustle in 2026

    You want income that runs while you sleep. No inventory. No support marathons. Just smart referrals that pay you when someone buys through your link. That’s affiliate marketing. Now add AI website builders and content generators, and you can go from idea to live site in an afternoon. Fast. Low friction. Real results.

    What you’ll walk away with: a clear 60–90 minute plan to launch an AI-powered affiliate marketing site, plus the exact next steps to start earning commissions this week.

    Roadmap: Pick a niche → Find programs → Build the site → Publish posts → Drive free traffic → Optimize.

    A character thinking while surrounded by notes suggesting various niches like 'Health & Fitness', 'Tech & Gadgets', and 'Travel Hacks', with a clipboard displaying options for niche selection.

    Pick a profitable niche you actually like

    Your niche decides whether this sticks or flops. Use two filters:

    1. People already spend money there.
    2. You enjoy talking about it.

    Proven evergreen niches:

    • Health & fitness
    • Personal finance
    • Travel hacks
    • Tech & gadgets
    • Beauty & lifestyle
    • Online business / creator economy

    Do this now: write down three niches you know or want to learn. Keep that list handy for step 2.

    illustration

    Find high-paying programs on Impact.com (fast match)

    You need products. Impact.com is a marketplace that connects publishers with hundreds of brands. Quick facts: it shows commission rates and EPC (earnings per click) so you can sort by what pays best.

    How to pick a program:

    1. Search a keyword from your niche (e.g., “travel,” “AI software”).
    2. Sort by commission or EPC.
    3. Do the payout math: $300 at 30% = $90; $10 at 30% = $3.
    4. Apply, explain briefly how you’ll promote, and grab your unique tracking link.
    An illustration showing a website creation interface featuring options for AI tools, a payment symbol, a mobile phone display, and sections for customization, including a header and personalization time estimates.

    Launch your AI-powered affiliate marketing site in minutes

    Old-school site builds take days. AI builders compress that into minutes. Hostinger’s AI Website Builder, for example, turns a short prompt into a full, mobile-ready site (pages, forms, images).

    Quick launch steps:

    1. Choose a plan that includes AI tools and a free domain.
    2. Enter your brand name and a 2–3 sentence audience description.
    3. Click “Create Website” and wait ~60 seconds.
    4. Personalize headers, about copy, and social links for 20–30 minutes.
    5. Add your Impact tracking links to product mentions.

    Why this works: you remove tech friction and focus on what sells—content and promotions.

    Write your first affiliate blog post (AI helps, you polish)

    Writer’s block is not an excuse anymore. Use your builder’s blog generator to draft a post, then tweak.

    Step-by-step:

    1. Pick one question your audience asks.
    2. Use AI to create an 800–1,000 word post (sweet spot for SEO and readers).
    3. Instruct the AI to embed your affiliate link where relevant.
    4. Edit for voice: short sentences, clear benefits, and 1–2 micro-stories or stats.

    Example prompt: “Write a beginner guide on social media content that converts. Include a section comparing three tools and hyperlink [YOUR IMPACT LINK] for the top pick.”

    Publish when: your post answers a real question, includes a clear CTA, and has working affiliate links.

    illustration

    Add optional digital products to increase margins

    Affiliates pay per sale. Digital products pay immediately and keep revenue higher.

    Ideas:

    • Fitness: printable workout logs
    • Finance: budgeting spreadsheet
    • Travel: packing checklist + mini-guide

    Hostinger and similar builders let you sell digital downloads with no transaction headaches. One extra product can lift average order value significantly.

    illustration

    Drive free traffic the smart way

    Traffic fuels commissions. Prioritize channels that compound with content.

    Your traffic stack:

    • Pinterest: search-driven, great for how-tos and product lists.
    • Short-form video (TikTok, Reels, Shorts): use clips to tease the guide and point to your bio.
    • SEO: target specific questions—consistency beats one big post.
    • Email: convert readers into repeat visitors with a weekly tip and links to your best reviews.

    A reasonable expectation: steady growth in weeks 3–12 if you publish consistently and repurpose content across channels.

    Checklist before you press “Go Live”

    • Custom domain connected
    • Logo and favicon uploaded
    • About and contact pages filled out
    • First 1–3 blog posts published with working affiliate links
    • Basic SEO titles and meta descriptions added
    • Google Analytics (or Matomo) installed

    Do this now: tick each box and publish. Your site is open 24/7 the moment you click.

    Illustration showing digital marketing strategies: swapping links, converting posts into short videos, and A/B testing email subjects, with visuals including a clock, charts, and currency symbols.

    Quick optimization habits

    • Swap underperforming links for higher EPC products.
    • Turn top posts into short videos.
    • A/B test two email subject lines.

    Small tweaks compound into bigger checks.

    illustration

    Affiliate marketing still boils down to recommending products people want. AI clears the tech and writing roadblocks so you can focus on niche choices, high-commission programs, and consistent promotion. Start with one niche, one site, and three posts.

    Ready when you are. Start your learning path on AI tools and practical tutorials at Tixu.ai — beginner-friendly lessons that get you from idea to income, step by step.

  • Automate Engraved Jewelry Sales with AI in 12 Minutes

    Automate Engraved Jewelry Sales with AI in 12 Minutes

    Your next micro-business: personalised engraved jewellery, ready to launch this afternoon

    illustration

    Why pet-portrait necklaces keep winning

    Open any marketplace and search “pet face necklace.” You’ll see thousands of recent sales. One Etsy shop that engraves pet headshots and names on round pendants pulls roughly $9,000 per month. Similar bar necklaces bring $7,000+. Full shops built around these pieces easily top $20,000 monthly.

    Why? Three reasons:

    • They’re emotional keepsakes people love to show off.
    • They’re light and cheap to ship. No sizing headaches.
    • They’re perfect for gifting: birthdays, memorials, holidays.

    Until recently, two hard limits stopped most sellers:

    1. You needed engraving hardware or an expensive fulfilment partner.
    2. Every order required manual photo prep—background removal, line reduction, vector conversion.

    The hardware problem is solved, and the file-prep headache disappears. Seriously.

    A visual guide with three steps: 'Free tools' at the top, 'Build steps' in the middle, and a checklist leading to a dollar sign at the bottom, with playful design elements.

    What you’ll walk away with

    By the end of this post you’ll have a clear, zero-code process to turn any pet photo into engraver-ready art. You’ll learn:

    • the free tools to use, and why they matter;
    • the exact build steps to make your image-to-vector app;
    • a simple launch checklist that gets you live today.

    Build this stack and you can launch a listing this afternoon. Ready when you are.

    illustration

    Sell emotional keepsakes that customers show off

    Pet-portrait necklaces sell because they hit feelings and impulse at once. That’s marketing gold. You don’t need massive inventory. You need a fast, reliable way to turn uploads into engraver files.

    illustration

    Launch personalised engraved jewellery with a zero-code stack

    Here’s the simple stack that removes the heavy lifting:

    1. Google AI Studio — builds a tiny web app that turns photos into single-colour vector files.
    2. Claude AI — improves your prompts and adds features like name fields.
    3. Printify — manufactures and ships engraved jewellery on demand.

    Optional extras:

    • Freepik — prettier mock-up templates.
    • Photopea — browser Photoshop clone for quick mock-ups.

    10-minute build — from photo to engraver-ready art

    Yes, really: ten minutes. Follow these steps.

    1. Open Google AI Studio and create a new project.
    2. Click Build. In the prompt box paste this spec: “Create a tool that accepts a user image, removes the background, converts the subject to a thin-line vector suitable for laser engraving, then outputs PNG/SVG at user-selected resolutions.”
    3. Add an image-to-vector connector. Pick the best-quality model so fur detail survives.
    4. Choose Gemini 1.5 Pro (or the latest Pro model) and hit Build.

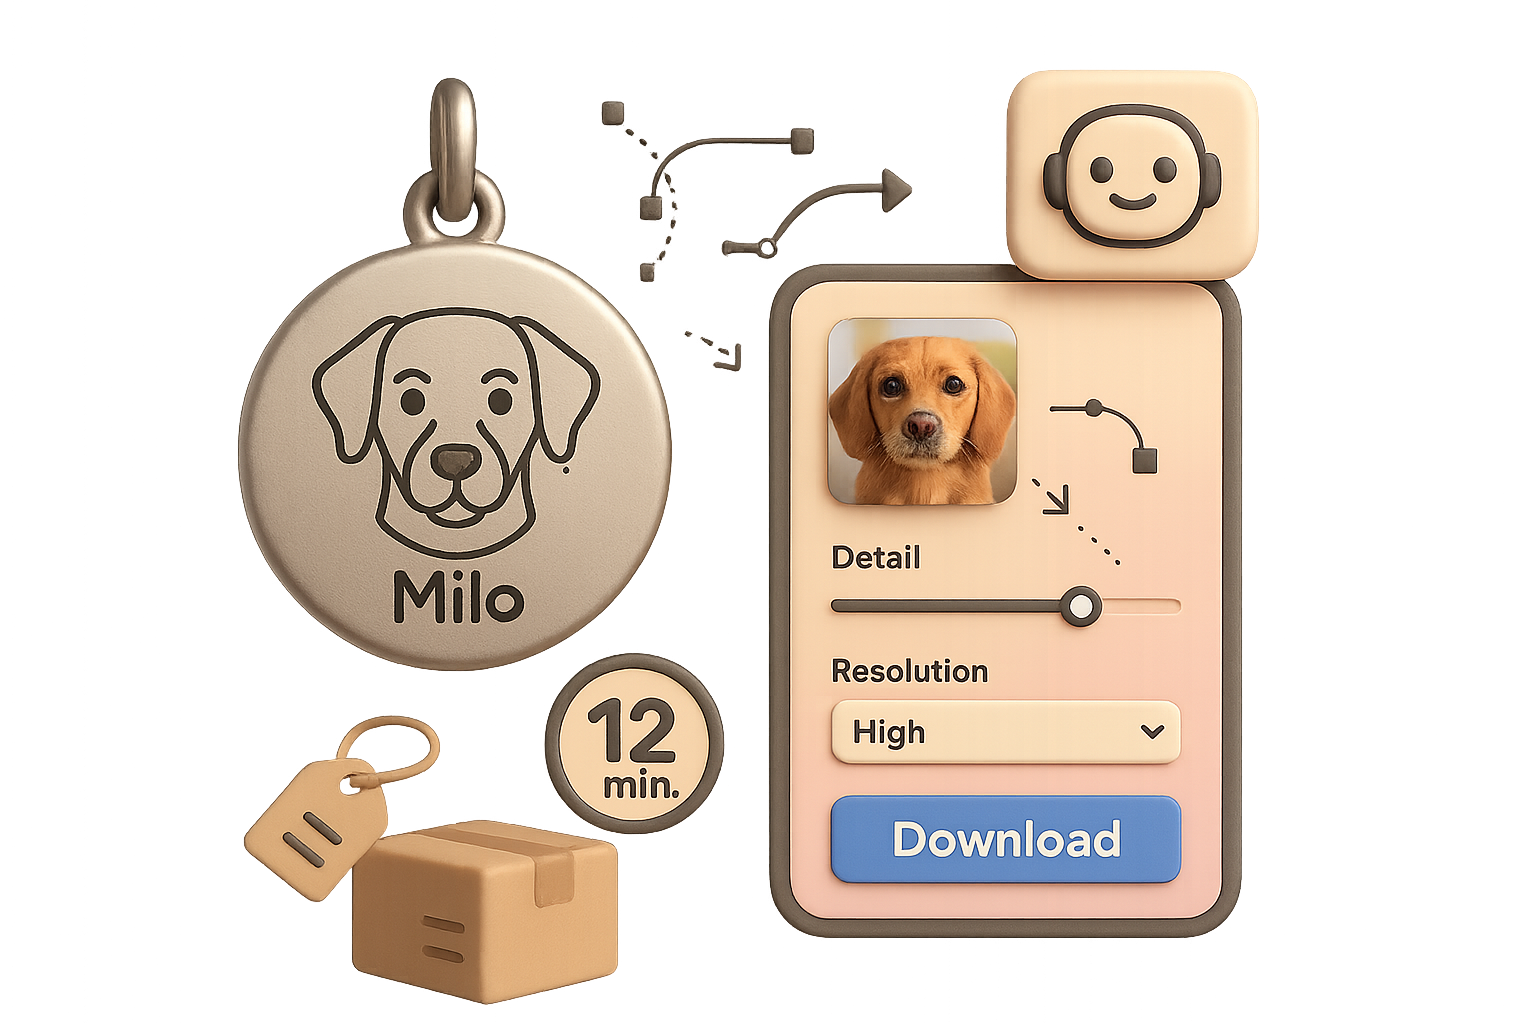
    In two or three minutes AI Studio assembles a working UI with:

    • an image uploader;
    • a detail slider to control line density;
    • a resolution dropdown;
    • a download button.

    Smarter prompting with Claude

    Want name fields, automatic size presets, or font toggles? Paste your initial idea into Claude AI. Ask it to expand the spec with UI copy, field validation, and export options. Copy Claude’s upgraded prompt back into AI Studio and rebuild. Now users can type “Milo,” position the name, and toggle fonts — no coding required.

    End-to-end workflow

    1. Customer uploads Fluffy’s selfie on Etsy or TikTok Shop.
    2. You drop that file into your AI Studio app, tweak detail, click Download.
    3. Upload the SVG/PNG to Printify’s round pendant product (base cost ≈ $12 + $4.50 shipping).
    4. Hit Publish. Printify engraves, packs, and mails the necklace.
    5. Sell for $29 and pocket about $12.50 per piece. Fast and repeatable.

    Better mock-ups boost conversion

    Printify previews work, but lifestyle shots convert higher. Do this:

    • Search Freepik for “engraved necklace mock-up.”
    • Open the PSD in Photopea. Replace the smart object with your AI vector.
    • Export JPEGs and upload to your listing.

    One good mock-up raises perceived value. That nudges buyers into checkout.

    illustration

    Launch checklist

    1. Pick one or two pendant styles in Printify (round disk + bar).
    2. Build and test your image-to-vector app in Google AI Studio.
    3. Order a sample ($16 well spent) for photos and QC.
    4. Create listings on Etsy and TikTok Shop with polished mock-ups.
    5. Offer two SKUs: “image only” and “image + name” to upsell.
    6. Run marketplace ads when organic reach plateaus.
    An illustrated graphic featuring a note labeled 'Forever my best friend,' a text formatting panel with font options, a chat interface with a user icon, a heart icon, and a checkmark.

    Quick tips that matter

    • Keep copy emotional and concise. People buy feelings fast.
    • Use clear size and font previews. Let buyers see exactly what they get.
    • Respond fast. Customer service converts repeat buyers.
    illustration

    You can launch personalised engraved jewellery this afternoon with no hardware and almost no tech fuss.

    Do this next: build the simple app and test one product. If you’re new to the AI side, learn the basics that power this stack at tixu.ai — beginner-friendly courses and hands-on labs make the setup faster.

  • Build Viral AI Ads for Any Brand in 3 Days

    Build Viral AI Ads for Any Brand in 3 Days

    Turn Scroll-Stoppers Into Shoppers: A Practical Playbook for AI-Generated Ads

    You lose attention in three swipes. Your creative doesn’t have to. Here’s a simple, repeatable system that gets you influencer-style vertical videos that look human, rack up views, and—most importantly—move product. No camera kit, no actor bookings, and no five-figure shoots. Just a repeatable workflow you can scale.

    illustration

    What you’ll walk away with:

    A 7-step pipeline for photoreal persona creation, still-to-video generation, and rapid variant testing. Roadmap: build a persona, craft the perfect first frame, generate a photoreal still, animate, then iterate. Expect to shave weeks off production time and spin up A/B-ready creatives in minutes.

    illustration

    1. Create a Consistent On-Screen Persona

    • Make one digital ambassador. Reuse them everywhere.
    • Find a natural headshot on Pinterest that matches your customer vibe. Skip airbrushed stock.
    • Turn that shot into a multi-angle reference set with ImageFX (Imagen 2) via your Gemini account or a wrapper like Higgsfield.ai.
    • Save 4–6 angles. These become your brand’s forever face.

    Why it matters: consistent faces increase trust and click-through. Brands that standardize visuals report faster creative learning and cleaner A/B data. Feed these headshots into every prompt for continuity across ads, thumbnails, and product pages.

    illustration

    2. Nail the First Frame that Stops the Scroll

    The start frame decides whether someone watches.

    • For fashion, grab a mirror-selfie frame. For gadgets, screenshot a top-performing TikTok Shop clip on Social1.io.
    • Match camera angle, lighting, and environment. Save the reference.

    A strong first frame halves your guesswork when you storyboard. Short contrast: a boring opener loses—you don’t.

    illustration

    3. Collect Sharp Product Assets

    Pixels equal believability.

    • Use the highest-res product photo you can find.
    • If you’re practicing, pick a viral item from CaliData and download the image.

    Sharper product photos make fabric, texture, and details read better in the generated video. That matters for conversions.

    4. Let an LLM Draft Your Image Prompt

    Stop typing adjectives and start prompting smart.

    • Paste persona headshots, product images, and your scene reference into ChatGPT or Gemini.
    • Ask for a detailed ImageFX prompt that replaces the original model with your persona and specifies pose, clothing, and camera distance.

    Edit the output. Tiny omissions—like “no shoes”—haunt the final render. Expect to iterate once or twice.

    illustration

    5. Generate a Photoreal Still (Your Key Art)

    This is the ad creative you’ll animate.

    • Upload: persona headshots, product photo, scene reference.
    • Paste the refined prompt into ImageFX or your Imagen wrapper.
    • Batch 3–4 images, set 9:16 aspect ratio, and 4K quality for Reels/TikTok.

    Pick the most convincing frame. This is your “key art” for the clip.

    illustration

    6. Animate the Still with Kling 3.0

    Turn a photo into buttery motion.

    • Upload the chosen still to Kling (Model 3.0).
    • Ask an LLM for a second-by-second Kling script for an 11-second clip. Example: “Girl records herself in a mirror, turns slightly to show trousers, no dialogue, natural movement.”
    • Generate with native audio disabled to save credits.

    Result: a vertical clip with subtle camera jiggle, fabric movement, and believable eye-lines. Expect about 2 minutes to render.

    7. Iterate Rapidly with Kling Omni

    Variants = more learning. More learning = better performance.

    • Open your finished clip in Kling Omni.
    • Swap the trousers image for a new color or style.
    • Regenerate to produce A/B-ready variants with the same movement and lighting.

    You maintain motion fidelity while producing multiple creatives in minutes. Early users report a ~60% faster creative cycle and stronger test signal when using consistent motion across variants.

    illustration

    8. Upload, Measure, Repeat

    Don’t ship and forget.

    • Push to TikTok, Instagram Reels, YouTube Shorts.
    • Test 2–3 variants per ad set.
    • Measure CTR, add-to-cart, and ROAS. Pause the losers fast.
    illustration

    Checklist: From Idea to Viral Ad

    1. Persona headshots (ImageFX)
    2. Scene reference (Pinterest / Social1)
    3. Product photo (high res)
    4. Prompt drafting (ChatGPT / Gemini)
    5. Photoreal still (ImageFX)
    6. Motion clip (Kling 3.0)
    7. Variant swapping (Kling Omni)
    8. Upload + test on socials

    Do this next

    1. Pick one product.
    2. Create one persona and three variants.
    3. Launch one A/B test this week.
    illustration

    Quick tips and tradeoffs

    • Keep clips short. 9–11 seconds often win for product reveals.
    • Disable synthesized voices unless you need them. Native audio eats credits and attention.
    • Use the same lighting and movement across variants to isolate product differences.
    illustration

    Source shortcuts

    • Gemini (Google) for ImageFX prompts.
    • Higgsfield.ai if you don’t have direct ImageFX access.
    • Social1.io for top-performing TikTok references.
    • Kling.ai (Kling 3.0 / Omni) for motion.
    • CaliData for viral product discovery.

    One persona, one key art, fast animation, rapid variants—turn scroll-stoppers into shoppers. Ready to level up your AI creative? Learn practical prompts, platform tactics, and beginner-friendly exercises at Tixu.ai. Start learning and ship your first AI ad today.

    Ready when you are.

  • Double Your Drive Productivity with Gemini in 3 Steps

    Double Your Drive Productivity with Gemini in 3 Steps

    NotebookLM: Smarter Study Aids and Better Organization (and why you should care)

    You ever lose your place in a study session? Or stare at a messy note pile and think, “There’s got to be a better way”? Google’s latest updates are solving that exact friction. If you want less busywork and more learning, these tweaks matter.

    Here’s what you’ll get in this post: the quick wins in NotebookLM, how Product Studio turns one product photo into dozens of marketing shots, and the Gemini features that make Drive behave like an assistant. Read fast. Try one thing. Win time.

    illustration

    NotebookLM: Pick up right where you left off

    • Resume quizzes and flashcards: NotebookLM remembers your spot. Close the tab or switch devices and jump back to question 3 of 10. No re-rolls. No hunting.
    • Shuffle and prune flashcards: Use “Shuffle set” to break pattern memorization. Delete a dud card and keep the rest — no deck surgery.
    • Detailed results pages: See how many you nailed and which you missed. Retake everything or focus only on trouble spots.
    • Custom infographics for everyone: The graphic-builder now rolls out to all users. Pick from nine visual styles (Professional, Sketchnote, Scientific, Kawaii, etc.) and watch NotebookLM redraw your data.
    • EPUB support: Upload digital textbooks or e-books and chat with them like you do PDFs or Docs.
    • Folders on the horizon: Native folders and possibly pinned notebooks are in active development. Relief from an all-in-one list view is coming.
    illustration

    Why this helps you

    • Save context. You don’t waste minutes digging for your place.
    • Study smarter. Shuffle, prune, and retarget missed items.
    • Visualize quickly. Infographics turn notes into shareable learning aids.
    illustration

    Do this next

    1. Open a NotebookLM flashcard set.
    2. Shuffle the deck and answer five cards.
    3. Close, reopen, and confirm it remembers your spot.
    illustration

    Automate the grunt work: Product Studio’s AI Photoshoot goes global

    If you sell something, you know product photos cost time and cash. Product Studio’s free “AI Photoshoot” just opened to 170+ countries. Upload one product image. Pick the scenes (studio, lifestyle, demo, flat-lay). Click Create photoshoot. Seconds later you get multiple high-res images, ready for social posts or listings.

    illustration

    How creators use it

    • Faster listings: one image → a full set of marketing visuals.
    • No studio required: replace expensive setups with AI-generated scenes.
    • Consistent brand style: choose the look and keep it across products.
    illustration

    Turn your files into action with Gemini in Drive, Docs, Sheets, Slides

    Gemini is weaving into Workspace. If you’re on Gemini Advanced (Pro or Ultra), here’s what you can do now:

    1. Conversational Drive search
      Type a plain question into Drive. Gemini answers, cites the source file, and lists related docs. You get the gist, not a needle-in-a-haystack.
    2. Match-my-doc formatting
      Select “Match doc format,” point to a template, and ask for new content. Gemini writes fresh text that looks like the original.
    3. Clone your writing voice
      Use Tools → Match writing style. Pick a reference doc and Gemini mimics tone and diction — formal report or cheeky update, your call.
    4. Turn PDFs into living spreadsheets
      Ask Gemini to convert a PDF into a Sheets workbook. It extracts data, builds check-boxes, and adds formulas so you can act on the numbers.
    5. Auto-generate Slides from your life
      Request a “life-update presentation for the last 60 days.” Gemini scans Drive, Gmail, and Photos (with permission) and builds a deck with layouts and speaker notes.
    6. Ready-made AI templates
      Find Gemini-powered templates for meeting notes, decision logs, email drafts, and summaries. Less setup, more output.
    illustration

    Why this matters for your workflow

    • Less copying between apps. Gemini operates where your files already live.
    • Faster content that matches your formats and tone.
    • Search that understands meaning, not just keywords.
    illustration

    Quick checklist: try Gemini features today

    • Ask Drive a plain-language question about a project.
    • Use “Match doc format” to create one templated doc.
    • Convert a short PDF into Sheets and play with the extracted data.
    illustration

    Why Google’s approach actually helps you

    Flip the script: Google isn’t asking you to learn a brand-new platform. It’s folding generative AI into tools you already use. That means:

    • Fewer app hops and less context switching.
    • Faster outcomes that respect your templates and tone.
    • Democratized design and photography for everyone — not just studios.
    illustration

    These updates aim to shave friction from study, content creation, and file management. Try one feature today — shuffle a flashcard deck, run an AI photoshoot, or ask Drive a conversational query.

    Want to learn the basics of AI so you can use these tools like a pro? Get beginner-friendly, hands-on lessons at tixu.ai — start learning practical AI skills in minutes.

    Ready when you are.

  • Automate Content Repurposing and Publishing in 15 Minutes

    Automate Content Repurposing and Publishing in 15 Minutes

    Stop Building Content One Post at a Time—Build a Claude Content Factory

    You’re juggling briefs, approvals, and half-finished drafts. Sound familiar? That’s not a content problem. It’s a process problem. Fix the process and you get steady output—without hiring ten more people.

    Claude won’t replace you—someone sharper with Claude will. Ready when you are.

    illustration

    The three layers of your Claude content system

    Build these three layers and everything talks to everything else.

    1. Context layer — your brand brain
      Store voice, audience notes, product details, and offer rules in the root of each project so Claude never has to guess.
    2. Skill layer — reusable instructions
      Save micro-prompts like “Write a carousel hook” or “Generate a feature image.” Teach Claude once. Use them forever.
    3. Orchestration layer — Claude Cowork + Claude Code + connectors
      Claude Cowork runs workflows. Claude Code handles scripts and API calls. Connectors (Notion, WordPress, NanoBanana image generator) move files where people actually work.

    Pro tip: One spreadsheet becomes mission control. Think brief, status, output path, publish date in one place.

    A digital illustration depicting a workflow system with folders labeled '/system', '/ads', and '/seo', alongside icons representing JavaScript (JS) and Python. The scene includes a pencil, blank cards, and jars filled with coins, suggesting a focus on organization and finance.

    Project folder blueprint

    Goldie Coffee keeps everything tidy. Copy this layout.

    • /system — Brand context, shared skills, Python/JS scripts
    • /ads, /seo, /social — Channel folders
    • Claude.md — Master project prompt that points Claude to your skills
    • content-planner.xlsx — One sheet per content type (brief, status, path, publish date)

    Do this next: add your /skills path to Claude Cowork global settings so agents auto-load them.

    A digital illustration of a workspace featuring various elements such as a layout design, sticky notes, files in a folder, and a coffee mug, all in a soft color palette.

    1. Highest ROI first: repurpose what you already own

    Why start here? You get more posts with less work.

    Workflow (do this)

    1. Drop three source blog posts into /social/input.
    2. Trigger the “Repurpose Content” skill in Cowork.
    3. Claude spins parallel agents and outputs:
      • LinkedIn posts with hooks, body copy, CTAs
      • Newsletter drafts with subject-line variants
      • Visual briefs + images via NanoBanana (an image gen tool)

    Result: 9 posts, 6 visuals, zero new research time. Goldie Coffee increased social output by 30% and saved ~12 hours/week. Not magic—just leverage.

    2. Automate on-brand carousel posts

    Carousels convert. Consistency doesn’t have to be a pain.

    Set up a Style Library:

    • Save reference slides showing colors, type, and layout in /social/style-library/carousels.
    • Add a one-page style guide.

    Then give Claude a tiny spreadsheet brief with columns: Topic, Platform, CTA, Status. Prompt: “Read the planner, create carousel sets for rows where Status is empty, update the sheet when done.”

    You’ll get 20–30 slides grouped by campaign. Schedule it: run every Friday at 9 AM and the queue refills itself.

    3. Push finished assets straight into your team’s workspace

    Visibility is distribution.

    Example: Notion content calendar

    • Write upload_to_notion.py (receives file paths + metadata, calls the Notion API—this is the connector).
    • Save it in /system/scripts.
    • From Claude Code: “For every row where Notion Status is empty, upload assets, then mark status ‘Scheduled’.”

    Now writers and designers comment in Notion. No folder spelunking.

    4. Ad creative at scale

    Ads need variety. Claude gives you fast versions for testing.

    Setup:

    • /ads/style-library — high performers and do’s & don’ts
    • /ads/input — product photos, backgrounds, competitor examples
    • content-planner > Ads tab — Campaign, Offer, Goal, Platform, Status

    Workflow:

    1. “Generate Creative Briefs” skill writes one-pagers.
    2. “Ad Creative Designer” skill creates five visual variations (Nanobanana handles image gen).
    3. Save outputs to /ads/output/[campaign-name].

    Outcome: 25 fresh concepts in minutes. Test faster. Spend smarter.

    5. Long-form SEO articles

    SEO compounds, but drafting eats time. Claude handles structure; you add the expert details.

    What you need:

    • Blog Brief Template in /system/skills
    • WordPress connector (or your CMS connector—this is the script that pushes drafts)
    • Planner tab: Topic, Target Keyword, Desired Title, Brief Path, Status

    Run “SEO Blog Writer”: Claude drafts a full article (H2s, tables, key takeaways), generates a header image, and Claude Code pushes drafts and media to WordPress. Human QA remains mandatory—add data and stories only you have.

    The playbook checklist

    1. Create project folder and add Context + Skills.
    2. Hook spreadsheet to Claude Cowork.
    3. Run Repurpose skill for existing assets.
    4. Schedule Carousel job (Friday, 9 AM).
    5. Wire Notion/WordPress connectors via small scripts.
    6. Build Ads and SEO pipelines next.
    illustration

    Quick numbers that matter

    • 9 posts + 6 visuals from 3 source blogs.
    • 20–30 carousel slides in seconds.
    • 25 ad concepts delivered in minutes.

    These micro-wins compound fast.

    Common objections, answered

    • “Isn’t this risky?” Yes if you skip QA. Always review.
    • “Will it sound robotic?” Not if your Context layer is strong. Train the voice once and enforce it.
    • “Is it expensive?” Start with repurposing. You’ll prove ROI before automating more.
    illustration

    One folder + one spreadsheet + Claude = a content machine that frees up weeks of work. Start by repurposing three posts this week.

    Do this next

    • Open your content planner and mark three source posts.
    • Create /system/skills with one “Repurpose Content” skill.
    • Schedule your first run for Friday.

    Want a friendly place to learn the skills and prompts that make Claude sing? Learn agent workflows, beginner-friendly prompts, and step-by-step labs at Tixu.

    Ready when you are.

  • Build Chrome Extensions Without Coding in 15 Minutes

    Build Chrome Extensions Without Coding in 15 Minutes

    Stop Copy-Pasting Code: Build Chrome Extensions With Claude Co-work in Minutes

    Tired of wrestling with manifest.json and file chaos? You don’t need to be a JavaScript wizard. Claude’s Co-work mode writes, edits, and reloads a Chrome extension right inside a local folder. You experiment, break things, and roll back instantly. Many builders finish a working prototype in under an hour. Ready when you are.

    illustration

    What you’ll walk away with

    • A working Chrome extension running locally.
    • A repeatable Co-work workflow you can use again.
    • A checklist to zip, publish, and iterate without hand-editing files.

    Roadmap

    1. Create the workspace.
    2. Tell Claude what you want.
    3. Load, test, iterate.
    4. Publish (optional).

    Follow the steps below.

    A digital illustration featuring various features of a software tool, including labels for 'No copy-paste chaos', 'Instant edits', 'One-click reload', 'Sonnet', and 'Opus', alongside a graphic representation of folders and a web browser interface.

    Why Claude Co-work matters

    Claude runs locally in a folder you control. That means:

    • No copy-paste chaos. Claude generates every file—manifest, content scripts, icons, popup UI.
    • Instant edits. Tell Claude to fix a selector; it rewrites the file and saves.
    • One-click reload. Chrome picks up changes without manual uploads.

    Use Sonnet for fast, cheap iterations and switch to Opus only for stubborn bugs.

    illustration

    Make a Chrome extension in minutes

    Here’s a simple, real-world example: “GPT Focus.” It strips distractions from chat.openai.com—sidebars, banners, model pickers—leaving only the conversation.

    Step 1 — Create a workspace folder

    1. Open Claude Desktop → select Co-work.
    2. Click the folder icon → Choose a different folder → New Folder → name it GPT Focus → Open.
    3. Grant “Always allow” so Claude can read/write inside the folder.

    Step 2 — Craft the prompt

    Tell Claude exactly what you want. Short, specific prompts work best.

    Example prompt: “Build a Chrome extension for chat.openai.com called GPT Focus. When enabled, hide the left menu, top model picker, upgrade banner, profile menu, and the ‘What are you working on?’ text. Add a toggle that turns focus mode on/off without a page reload.”

    Claude instantly creates a sub-folder (e.g., gpt-focus-v1) with manifest.json, content scripts, icons, and a popup UI.

    illustration

    Step 3 — Load the unpacked extension

    1. In Chrome, go to Chrome Extensions.
    2. Turn Developer mode on.
    3. Click Load unpacked → select the …-v1 folder.
    4. Toggle the extension on and refresh ChatGPT.

    Step 4 — Debug in seconds

    First try fails? Don’t sweat it. Tell Claude what broke.

    Example: “The toggle stays greyed out.”

    Claude finds the wrong DOM selector, rewrites the content script, and saves. Back in chrome://extensions click the reload icon, refresh the page, and test again—no file juggling.

    illustration

    Step 5 — Visual polish and small features

    Ask Claude to tweak UI or animations: “Add a subtle shadow in light mode and a neon glow in dark mode.” Or: “Remove animations, keep the toggle fix.” Iterate until it feels right.

    Quick wins

    • Don’t move the workspace folder: Chrome links the extension to that path. If you move it, reload the unpacked build from the new location.
    • Keep versioned folders (gpt-focus-v2, v3) so you can roll back easily.
    • If you have tight quotas, use Sonnet for most work. Switch to Opus for stubborn issues.
    • Claude’s browser integration (the official Claude for Chrome extension) can inspect live pages to produce precise selectors.
    illustration

    Mini success snapshot

    Carlos launched a small productivity extension using this workflow. He added a simple premium toggle and earned about $1.2k in his first month from a few hundred users. Small, focused features scale if they solve a real pain.

    Publish to the Chrome Web Store

    1. Zip the build: right-click the …-v1 folder → Compress (macOS) or Send to › Compressed (zipped) folder (Windows).
    2. Create a developer account: visit Chrome Web Store Developer Dashboard. One-time fee $5–$10.
    3. Upload the package: New item → choose your ZIP. Let Claude draft your description, single-purpose text, and permission justifications. Paste its output into the dashboard.
    4. Assets & screenshots: the Web Store wants 1280×800 px images. Quick fix: capture a screen, open Canva → Custom size → 1280×800 → drop your screenshot → download.
    5. Privacy policy: ask Claude to write “we collect no data” wording, paste it into a public Google Doc, copy the share link, and add it to your listing.
    6. Submit for review: Save draft → Submit for review. Extra permissions (like “storage”) may extend review time.
    illustration

    Action box — Do this next

    1. Open Claude Desktop → Co-work.
    2. Create a workspace folder named after your idea.
    3. Paste a one-paragraph prompt describing the extension’s single purpose.
    4. Load the unpacked folder in chrome://extensions and test.

    Best practices

    • One big idea per extension. Keep it focused.
    • Write concise prompts. Claude performs better with clear constraints.
    • Log changes in a quick changelog file inside the folder. You’ll thank yourself later.

    You can ship a polished Chrome extension without manually editing files. Claude writes the code, fixes bugs, and drafts your listing—your job is to dream and iterate. Try building your first extension with Claude Co-work, then level up your AI skills at tixu.ai — a beginner-friendly AI learning platform that helps you go from curiosity to confidence.

  • Generate Reports & Decks with NotebookLM in 15 Minutes

    Generate Reports & Decks with NotebookLM in 15 Minutes

    Turn NotebookLM into your PDF-to-deck production studio

    You need results, not a thousand tabs and a second job copying content. NotebookLM’s overhaul turns it from a Q&A toy into a production-ready assistant that digests mixed files and spits out client-ready deliverables. Ready when you are.

    illustration

    Automate the grunt work: when NotebookLM wins

    NotebookLM shines when three things line up:

    • You already own the answers — docs, reports, transcripts, slides.
    • The files come in mixed formats — PDFs, Sheets, Slides, audio, video.
    • Accuracy matters more than wild creativity — you need citations, not guesses.

    NotebookLM doesn’t replace creativity. It replaces busywork. You still steer the vision; NotebookLM cleans the runway.

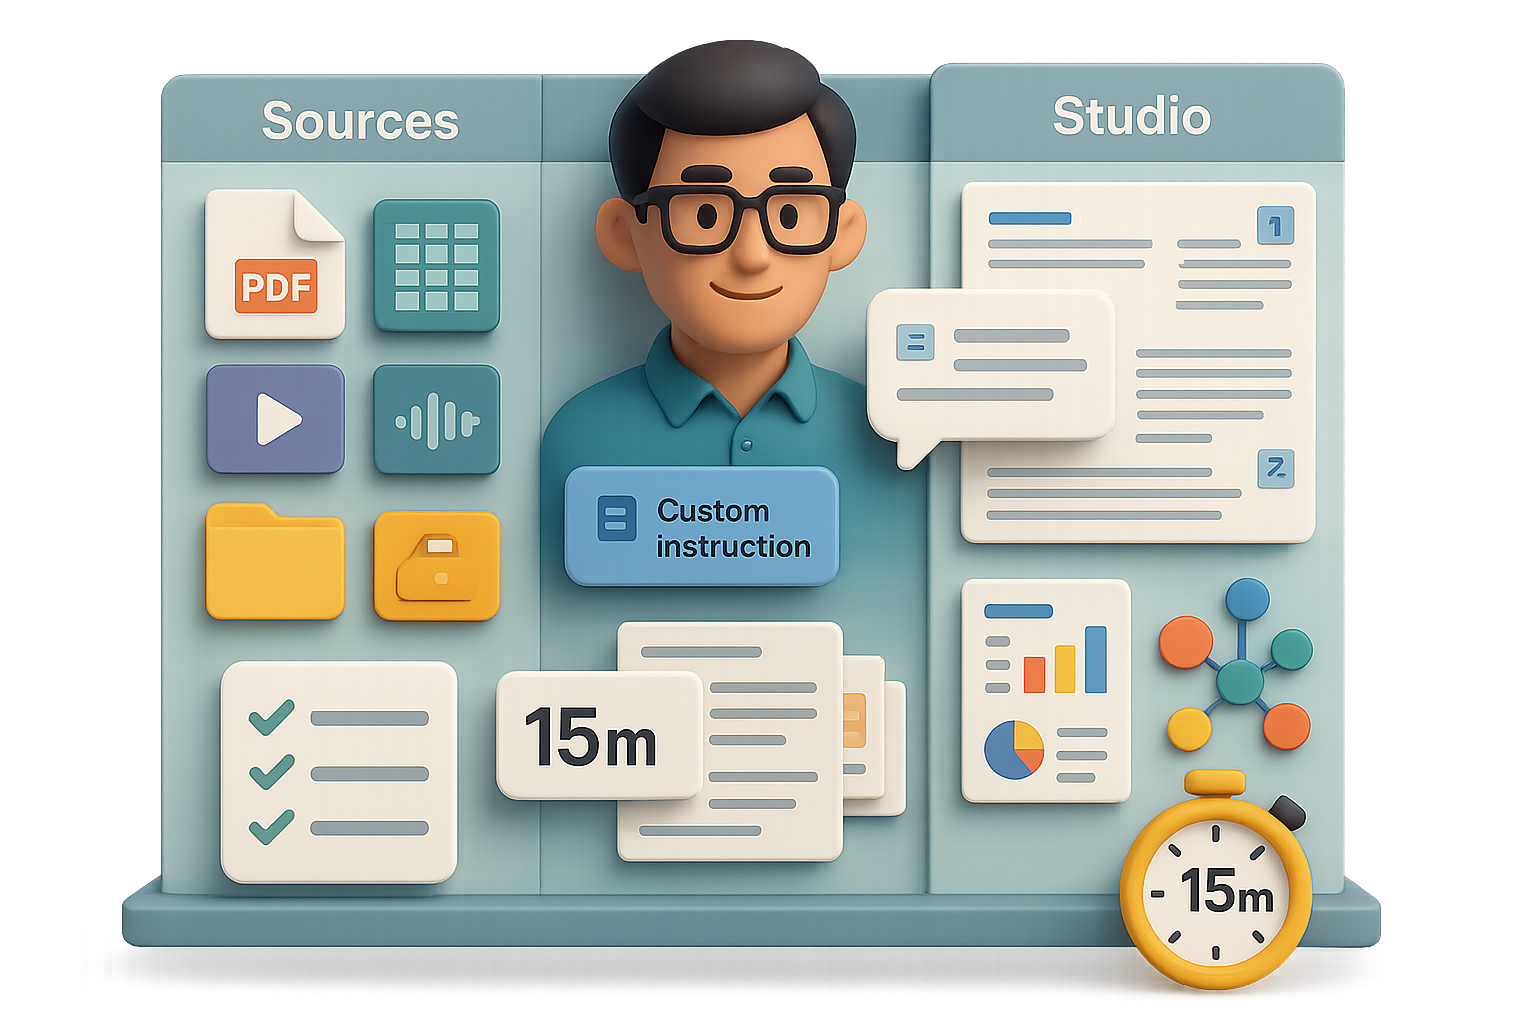
    illustration

    A 3-panel workflow you’ll use every day

    1. Sources — Drop everything here.

      Drag Google Docs, Drive files, PDFs, YouTube links, or paste cleaned webpages. Use the built-in discover box to pull quick web or Drive research. Pro tips:

      • Keep web sources to three. Less noise, better accuracy.
      • Drive files sync live; click “refresh” after edits.
      • Can’t add a page? Paste cleaned text as “Copied text.”
    2. Chat — Your source-grounded assistant.

      Before you ask, hit Configure chat → Custom instruction and paste a clear brief. Example:“Every response helps me draft a one-page proposal that increases MAUs in APAC.”

      Clear the chat when you pivot topics. Save nuggets as Notes or promote them to Sources so future answers stay consistent.
    3. Studio — The big upgrade.

      This is where NotebookLM converts answers into finished assets. Reports, Slide Decks, Infographics, Mind Maps — all come out formatted, citation-tight, and ready to tweak.


    Four blocks featuring various data visualization elements including tables, charts, and graphs, alongside jars filled with coins and dollar signs.

    Tier-1 Studio tools that actually save time

    • Reports — Competitive analyses, executive briefings, budget breakdowns. Pick a suggested format or paste a custom prompt. Minutes later you have headings, tables, and citations.
    • Slide Decks — Choose Presenter (visual) or Detailed (readable). Exports as image-based PowerPoint so your narrative doesn’t drift in formatting. Want a LinkedIn carousel? Ask for a 9:16 vertical deck — one click.
    • Infographics — One-page visuals. Upload a brand guide and add “follow brand colours, fonts and style” to nail the look.
    • Mind Maps — Auto-skim your sources and map topics visually. Click a node to open a chat focused on that branch.

    Tier-2 tools when you need them

    • Data Tables — Pull scattered facts into a sortable sheet and export to Google Sheets.
    • Video Overview — Condense long transcripts into a narrated slideshow; cinematic modes add AI animation (Gemini Advanced users). Gemini = Google’s creative model; Claude and ChatGPT fill similar creative gaps.
    • Quizzes & Flashcards — Make MCQs or spaced-repetition cards grounded in your docs. Great for training.
    • Audio Overview — Turn long newsletters into podcast-style summaries.
    illustration

    Do this next

    1. Drop 1–3 representative sources into NotebookLM.
    2. Paste one clear instruction into Custom instruction.
    3. Pick Studio → Reports or Slides and hit generate.
    4. Review citations, refresh sources if needed, then export.

    Best practices for friction-free outputs

    • Write the brief once. A good custom instruction beats endless prompt fiddling.
    • Cap web sources at three. Keeps the model honest.
    • Use NotebookLM for accuracy; use Gemini/Claude/ChatGPT for creative riffs, then feed those snippets back into NotebookLM as sources.
    • Save golden answers as Notes. Promote repeatable templates to Sources.
    illustration

    Everyday ideas you can try this afternoon

    • Year-on-year health reports — Auto-highlight metrics that spiked.
    • Meeting knowledge base — Drop every transcript and ask, “What did we promise Acme Corp last quarter?”
    • Tax season autopilot — Upload statements and ask, “Which deductions apply to a single-member LLC with these expenses?”
    illustration

    Quick checklist before you export

    • Sources: relevant and capped at 3 web pages.
    • Instruction: clear, outcome-focused, and saved.
    • Output: citations verified; brand guide applied if needed.
    • Final pass: creative polish in Gemini or ChatGPT if the brief calls for it.

    Load the right sources, set one clear instruction, and let NotebookLM produce the deliverable. One-sentence takeaway: use NotebookLM to cut hours of grunt work and keep creative calls where they belong — with you.

    New to AI? Learn practical AI fundamentals and quick, hands-on workflows at Tixu — a beginner-friendly learning platform that teaches you how to use tools like NotebookLM effectively.

    Happy building.

  • Automate Daily Briefings: Build OpenClaw Agents in 15 Minutes

    Automate Daily Briefings: Build OpenClaw Agents in 15 Minutes

    Meet Your New AI Teammate: OpenClaw That Actually Does the Work

    You’re swamped. Inbox balloons, meetings multiply, and the “simple” tasks never end. OpenClaw is an open-source, self-hosted AI agent that behaves less like a chatbot and more like a proactive colleague. Hook it to models you already use—Claude (Anthropic), GPT-4 (OpenAI), or another API—and it can read and triage email, manage your calendar, run shell commands, and chat from Telegram or WhatsApp. Best part: it runs on your server, so you keep control of data and privacy.

    illustration

    Deploy OpenClaw safely

    Why use a VPS? OpenClaw gets root-level permissions to create, edit, and delete files. Running it on your everyday laptop opens you to accidental leaks or a rogue prompt. A virtual private server isolates risk and lets you reset in minutes.

    Quick deploy checklist:

    1. Sign up at Hostinger (one-click OpenClaw template available).
    2. Pick a 12-month VPS plan and enable daily backups.
    3. Copy the autogenerated gateway token and save it in a password manager.
    4. Add $5 of credits to your model provider (Anthropic or OpenAI) and create an API key.
    5. Paste the API key into the Deploy form, hit Deploy, wait ~5 minutes, and log in with the gateway token.

    Do this next: deploy to a VPS with backups turned on. If something goes sideways, you can rebuild in minutes.

    illustration

    Make it your colleague

    OpenClaw wants two things: a role and a channel.

    • Say “hello” in the dashboard chat. The onboarding Q&A sets its role, tone, and goals.
    • Create a mobile channel. Telegram is fastest—tell the agent “Set up Telegram,” follow the bot link, and you’re live. Now you can leave the browser behind.

    Result: you get push updates and briefings on your phone. One user reported cutting meeting prep time by ~40% in week one.

    illustration

    Build a team of sub-agents and save tokens

    A single agent handles tasks one at a time. Sub-agents run tasks in parallel while keeping context clean.

    Example prompts you can paste:

    • Create a persistent agent named Atlas.
      Role: dedicated research assistant.
      Model: Claude Sonnet.
    • Create a persistent agent named Iris.
      Role: coding assistant.
      Model: GPT-3.5-Turbo.

    Why this matters: heavy reasoning lives on stronger models (Claude Opus, GPT-4); routine jobs run on cheaper models. You save tokens where it counts and keep output quality high.

    Automate the boring stuff

    OpenClaw supports natural-language scheduling. Drop an instruction and forget it.

    Examples:

    • 3:45 p.m. daily — scan tomorrow’s calendar, research each attendee, and send a meeting briefing to Telegram.
    • 9:00 a.m. daily — transcribe yesterday’s voice notes, extract ideas, and draft three social posts.

    All schedules appear under the Cron Jobs tab. Toggle them on or off in one click. Expect a steady stream of useful briefs while you get on with higher-value work.

    illustration

    Install skills and extend what it can do

    Out of the box, OpenClaw chats and runs shell commands. Skills expand that toolbox—web search, smart-home control, spreadsheet editing, and more. There are nearly 19,000 community skills on Claw Hub.

    Quick skill install:

    1. Tell your agent: “Install the Claw Hub skill.”
    2. Ask: “Find me a skill that searches Reddit.”
    3. Or paste a GitHub URL (for example, last-30-days) and tell the agent to install.

    Safety tip: prefer skills with high download counts and positive ratings. Don’t install random scripts without a quick review.

    illustration

    Teach it to remember and get better

    Language models forget. OpenClaw’s compaction compresses old messages, which risks losing details you want to keep.

    Fix it fast:

    • Paste a prompt telling the agent to save key facts—preferences, decisions, project notes—to a separate memory file before compaction.
    • Use the feedback loop: every correction (“write shorter emails,” “use UK spelling”) logs and updates behavior.
    illustration

    Security and governance—keep control

    • Keep API keys off public servers and in a password manager.
    • Use a VPS snapshot before risky installs.
    • Limit skills that request external access until you review permissions.
    illustration

    Layer a secure VPS, a personality and mobile channel, sub-agents, schedules, skills, and persistent memory, and you get an AI teammate that handles the grunt work while you do real work.

    Do this next: spin up a VPS, deploy OpenClaw, and give it a first task—triage your inbox for the last 24 hours.

    illustration

    Learn faster with guided lessons

    If you’re new to agents or want a friendly ramp-up, check out tixu.ai — a beginner-friendly AI learning platform with hands-on lessons and clear, practical examples. Ready when you are.

  • Start 3 Simple AI Businesses in 24 Hours

    Start 3 Simple AI Businesses in 24 Hours

    AI side-hustle ideas: 3 simple AI businesses you can build today

    Ready to turn your “AI side-hustle browsing” into real, bill-paying revenue? You’re two hours away from a working demo. Small businesses are leaking money every day from clunky websites, missed calls, and boring social posts. Fix one of those leaks, charge for the fix, and you’ve got a repeatable business. This post gives you three bite-sized models, exact setup steps, typical pricing, and a quick closing trick.

    illustration

    What you’ll walk away with

    • One clear business to test today.
    • A step-by-step demo workflow.
    • Typical pricing and an easy pitch line.
    illustration

    AI side-hustle #1 — Flip old websites into cash

    Problem: Local businesses still use dinosaur sites that lose mobile customers.

    Solution: Build a mobile-first prototype with an AI site builder and sell the upgrade. Hostinger’s AI builder (an inexpensive, beginner-friendly website tool) can generate a full site in minutes. No code. Big visual payoff.

    Quick workflow

    1. Buy a basic Hostinger plan (≈ $50 first year).
    2. Dashboard → Website → Add website → AI Builder.
    3. Enter the business name, drop a short prompt about colours and pages, then hit Generate.
    4. Swap in 3–5 photos from the company’s Instagram. Publish to a temporary URL.
    5. Email the owner: “Thought you might like to see how your brand fits mobile — want this live this week?”
    6. Close the deal: typical fee $1,000–$3,000. Upsell hosting or a monthly updates package.

    Why it sells

    • Dramatic before/after is persuasive.
    • Owners see the site on their phone and say yes.
    • Minimal tech skills required.
    illustration

    AI side-hustle #2 — Install a 24/7 AI phone agent

    Problem: Missed calls and hold music cost small businesses customers and credibility.

    Solution: Build an always-on AI receptionist that answers FAQs, books appointments, and hands off to humans when needed. Use ElevenLabs (voice and agent builder) plus ChatGPT (knowledge summariser). ElevenLabs creates natural-sounding voices; ChatGPT helps extract the business info.

    Rapid setup

    1. Create an ElevenLabs agent and pick a brand-appropriate voice.
    2. In ChatGPT ask: “Summarise publicly available info on [business URL] — hours, services, pricing.”
    3. Paste the summary into the agent’s knowledge base. Save.
    4. Test with a living number; demo on speakerphone to the owner.

    Pricing cheat-sheet

    • One-off build: $2,500–$5,000.
    • Monthly retainer for tweaks & call analytics: $300–$500.

    Closer tip
    Walk in with the working agent on speaker. Hearing their business answered perfectly seals the deal.

    illustration

    AI side-hustle #3 — Pinterest marketing on autopilot

    Problem: Brands know Pinterest drives evergreen traffic, but producing fresh, clickable pins is a grind.

    Solution: Use Freepik’s AI Image Generator (high-res outputs, no watermark on paid plans) to produce month-long pin calendars in 30 minutes. Schedule them with Tailwind or Pinterest’s scheduler.

    How to create a month of pins in 30 minutes

    1. Grab a high-performing pin as a visual reference and a clean product photo.
    2. In Freepik’s AI Image Generator upload both images and describe the style and headline.
    3. Generate multiple pin concepts, download the winners.
    4. Schedule in Tailwind or Pinterest Scheduler.

    Average retainer
    $500–$2,500 per client per month. Scale to multiple clients because creation time is negligible.

    Monetise for yourself
    Want to push your own products or affiliate links? Same system. Same results.

    Quick comparison (so you can choose fast)

    • Start-up cost
      • Website Upgrader: ≈ $50 first year.
      • Phone Automator: ElevenLabs $5–$22/mo after trial.
      • Pinterest AI Marketer: Freepik AI ≈ $12–$19/mo.
    • Skills needed: copy-paste, basic prompts, and a phone.
    • Revenue potential: $1,000–$5,000 per project or per month, depending on one-offs vs retainers.
    illustration

    Do this next (two-hour demo checklist)

    1. Pick one idea. Block two hours on your calendar.
    2. Build a live demo (temporary site, working agent, or a scheduled pin batch).
    3. Book one local owner for a five-minute demo. Show them the before/after.
    4. Ask for a paid pilot or a small deposit.
    illustration

    Mini-FAQ

    • Need coding? No.
    • Tools hard to learn? No — each tool has templates and wizards.
    • Where to practice? Build demos, not slides. Clients want to see working stuff.
    illustration

    Pick one idea, build a demo in two hours, and show it to one local business this week. Want a friendly place to learn the AI basics and get quick walkthroughs? Start with tixu.ai (beginner-friendly AI learning platform)

    Ready when you are.